So, I learned this cool technique for rapid prototyping in concept art recently. It's pretty fundamental but hey, I've not used it before!
Basically, you create quick component pieces of what you want to create. Legs, arms, heads, basic body shapes, accessories, etc. It works well for cars, aliens, animals..anything really, but when I first heard the idea, robots seemed like the best fit for an initial try!
As such, I created the above, a selection of 'ROBOT PARTS', as I've so mysteriously named. It's a pretty safe set that didn't take me very long to mock up. The important things to remember here are:
a. We're focusing on the profile of the image
b. Shapes should fit together ~relatively~ well with little editing.
From here it was pretty easy to mock up some initial robot designs:
I've obviously added some small features to individual ones here, hanging wires, lights and the like, but overall almost all elements are available in the initial spec.
And I strongly believe that if I'd just tasked myself with creating 4 robots from scratch, I wouldn't of created anything so detailed with such funky outlines, and definitely not so quickly!
Showing posts with label Guides. Show all posts
Sunday, 29 January 2012
Sunday, 31 July 2011
A series of fortunate events
I've been drawing a lot of chibis and other block colour images recently and feel a little out of practice with other types of art, so I started sketching out some 1 inch poses and recreating them as rough full size versions, then I moves onto just drawing hands and legs:
As you can see, inspiration struck as I started fleshing out some of the images! As such, there's an image in my gallery I've been wanting to recreate for a while...
It was the first image I experimented with (extremely) curly hair, which then became a bit of a theme of mine for a while... Green! Purple! Copper!
As such, I began recreating this piece, with one of the first things I worked on being, you guessed it...
The lovely curls! I chose this particular bit to focus in on as it shows that I FINALLY found a way to end the curls! All of these the end curls are curling inwards, however some (one, the upper right one in the next image) curl out.
I also did all this from memory, so when I went back to the face I realised it looked a bit... bland and unrealistic. So I got a lovely reference image from [here] and the following occured!
The left is the reference, the right is the original, and the middle is the recreated face using the reference. As The Boy states, she finally looks more 'chocolate' than 'cocoa'. In general I softened the features, made the eyes smaller and less anime-esque, brightened the lips, changed the skin tone and reshaped the nose.
Thanks to anyone who read this all the way through!
Labels:
Guides,
Picture Included
Wednesday, 27 July 2011
Fast as ass
Gradient (Circular) -> Select lower half -> Perspective to make wider -> Black line across middle -> Make it bumpy! -> Select lower half again -> Filter -> 'Ripple'
And that's how you do a 2 minute landscape.
NOW! Still fast, but some 'actual' art:
A quick little commission for a lass over at GaiaOnline. Unfortunately, I don't have anything to post today that took more than 15 minutes due to working for quite a few hours on a piece I won't be posting! I may post components of it but the full, finished piece will never appear on this blog I'm afraid. :<
Also, yesterday this blog reached 2,000 hits! I've more than doubled my reader base every month this blog has existed so far, but I'm particularly pleased with this news! Particularly as exceeded the amount of views my DeviantArt account has, which I've had for around 3 times the length.
Overall, thank you all for watching and I hope to be posting something a bit more entertaining tomorrow!
Labels:
Guides,
Picture Included
Saturday, 23 July 2011
That's one hell of a walk through
Not only the longest walk through I've created so far, but probably the longest walk through I've ever seen...
It covers some (most) of the techniques I used in creating this piece, though in a while I won't be posting many more of these as I've decided to look into doing livestreams!
At the moment I'm thinking of just having the livestream open while I work, but I'm trialing how to have music playing to the audience while I work, etc. before I properly start and take requests while doing it.
Also, there's a look little almost-optical-illusion with this tutorial, in that if you scroll up and down pretty quickly, the far left line surrounding the text boxes appears to expand and retract as you go. This is due to the saturation of the colour with the 'brighter' teal seemingly creating a thicker line.
Labels:
Guides,
Picture Included
Friday, 15 July 2011
Ahm Bloo
[Click for full size]
Been on a bit of a background-binge recently. Rather down to finding a palette I adore and not feeling like giving it up just yet...
Anyway! If you've seen many of my previous scenery pieces, I'm rather fond of the idea of floating islands, particularly those with water cascading off them. It's a neat little idea (I think!) as it firmly sets a piece in a fantasy setting and allows me to play around with water effects.
As you can tell from these pieces, I've been trying out a new painted-style using a soft round brush on wide spacing with very low opacity (something I usually struggle with, but it's essential to keep the opacity low in order to keep your image from looking too flat) and long, sweeping strokes mixed with hard spots.
One of the main issues I've encountered with this set is in the second piece, imagining we're looking at this scene through a camera, both the foreground and far background are blurry, assuming a mid-range focal point. However...there just isn't one. There was nothing on the original piece I did to work with so I was left with a horrible unfinished feeling over the second piece. I'm rather tempted to re-do the second image, moving another of the floating islands closer to be within the shot so we can use that as our focal point, however it looks like I'm going to be very busy from now until next Wednesday so we'll have to see what happens!
Labels:
Guides,
Picture Included
Sunday, 10 July 2011
A double ended chainsaw and other tools to avoid
Good evening! I've realized I should explain some of the brushes I use and why I use them. However, I instead decided to show you brushes I never go anywhere near! Okay, depending on the piece I will occasionally use smudge, but other than that...
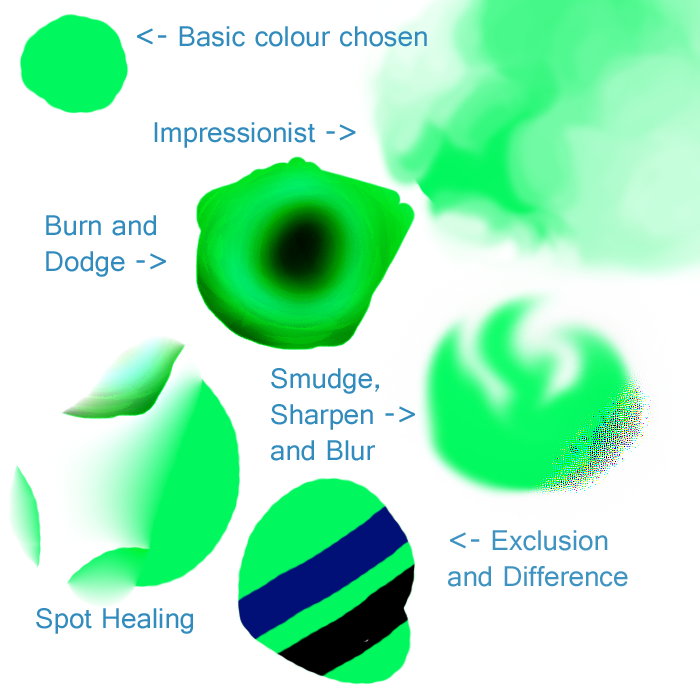
To begin with, I chose a nice off-green colour, the human eye naturally picks up green better than any other colour in the spectrum thanks to how much of our perceived gamut is taken up by green. (http://www.photo-lovers.org/img/gamut.png)
With this decided, to the brushes!
Impressionist can give an interesting watery look, however I find it far more interesting to see it in action than looking at the final result.. It works by taking the colour making up the majority of the brush radius at the time, filling the area of the brush with just that colour and blending the colours around it in with itself. Personally, I just can't find a style where this brush is suitable. It looks almost cartoonish, but I prefer a cleaner style for my cartoon pieces as blurring implies higher definition, making the eye look for details which just aren't there. To me, this brush creates a very dull "realistic" look that I can't wrap my head around.
Next we have burn and dodge. One lowers saturation, one increases shade (basically, one adds white, one adds black). It's an incredibly fast way to shade things, but...well, that's not how shading works. Light in itself usually has some sort of colour and it's this which should be used to light things. If you take any good picture of a lit human face from Google, use your eye dropper tool along where the shading begins to occur. Is it the skin colour, only darker? Usually not. You'll tend to find few dark peach colours and more blues and greens. Burn and dodge obviously don't take any of this into account, so I always stay well away.
Smudge, sharpen and Blur. Now, this is an awkward one, as I've recently taken to using smudge more... Sharpen and blur though! Sharpen, I've just never found a use for. Use it for even slightly too long and, instead of sharpening up edges and getting rid of blur, you get these horrible blocks of colour. Having tried sharpen a few times, I find other techniques much faster in tidying up blurred edges to this.
Blur...is fine if used sparingly. My main issue with blurring is that, if used over larger areas, it's very noticeable. You can usually tell when someone's been overdoing the blur, so I tend to try to avoid it all together if possible.
Spot Healing is a relatively new tool that I'm sure if great in photographs, but just..doesn't work very well for the kind of digital images I produce. You select an area with the brush, then let it do it's magic to get rid of the object you've selected and make it seem it was never there. Got an ugly bird in an otherwise beautiful sky? This is the tool for you. A misplaced toy on the floor of that photo of your daughter playing outside in the grass? Spot heal it away! Digital images? Yeeeeah...not so much. The issue here is the way it works is by sampling the area around the selected area and filling in the 'blank' with details and, if needed, blur anything left over in the area. Here we started with a green circle, and tried to remove the left of it. Instead of ending with half a circle, it sampled the area around 50 pixels to the right of where we selected and just copy-pasted it over the blurred out image of what we selected.... Not so great.
And the final part of this wall of text which I'm sure will get a few TL:DR's, exclusion and difference! Now, these arn't brushed in themselves, but types of the main brush. I just...don't see the point in them, what-so-ever. Exclusion is the slightly more interesting out of the 2, at least. Say you have an image you want to make black and white, but leave in the red? Go over the whole image a few times in pure green and pure blue brushes on exclusion and that's what you'll get. (Note: Here I was using a green brush over the green circle, hence leaving a black line). Difference left me with a blue line and...Well I just plain don't see the point in this one at all. Really, I'm not sure what you're meant to use it for or why anyone would use this. If someone knows, tell me? :)
Labels:
Guides,
Picture Included
Friday, 8 July 2011
Mobile Phone Wallpapers
On my Facebook page (http://www.facebook.com/pages/Krillatron/201179829933655?sk=wall) I've was asking people for their native resolutions to get a good idea what the majority of people use, mainly because I use a 1080p screen and so tend to design wallpapers for this resolution (I use a rotational wallpaper system and currently have 5 of my own pieces displaying on my laptop, kiiinda vain ><), however I've been wanting to branch out for a while and this seemed an idea way to do it.
As such, I was requested to create a mobile phone wallpaper, after a quick search for the native resolutions I was able to create this! I had a 15% opaque black box on a separate layer placed over this piece so I could see what the user could see (it's for a HTC phone where the wallpaper scrolls left and right slightly, so I generally kept the box central to see what the main image would be, as such when loaded onto a phone this image will show most of the tree though will be coming from the right-hand side of the screen, and must be panned to the right to reveal the rest of it's shape. I felt this slightly off-center nature would work well with the idea of panning across the image and 'discovering' more of it, as opposed to having a static image in the center and nothing on either side).
I used a technique I'm sure you're familiar with if you've been following my work, in that I did 2 gradient layers and erased one to reveal the other to get this effect. The detailing around the tree was on yet another layer, which I achieved by selecting the tree, expanding the selection by 3 pixels, making a new layer beneath the tree layer and putting a blue to red gradient over this aswel..
That's all for today! I'm getting ready for my graduation tomorrow (getting ready tomorrow, not graduating tomorrow, as my graduation's on Wednesday~) but will still post something up!
Labels:
Guides,
Picture Included
Sunday, 3 July 2011
60 seconds
Restricted myself to 60 seconds per 'scene' here, which is damningly hard!
I went into this with some general ideas, blue = water or sky, green = forest, etc. but when you've been madly trying to cram all your ideas in as fast as you can it's hard to change your frame of mind so quickly to another type of scene.
To help get through the process, I began with just using the rule of thirds and later decided doing a general shape and sticking with it was the way to go. This is most noticeable on yellow through to dark blue, with a straight line -> circle -> 'S' curve -> circle -> triangle being most prominent on these.
The width and thickness of line were generally used here to denote depth, though sometimes used to exaggerate features within the image.
That's all for today! Though as an added extra, I've compiled my favorite dragons into a single image!
Labels:
Guides,
Picture Included
Friday, 17 June 2011
Under the sea..
Finally finished the underwater piece I've been working on for my parent's bathroom!
The final piece hasn't turned out exactly as I hoped, and I've created 2 versions, a monitor-friendly version (the piece showed) which includes darker shadows and the like, and a higher contrast, generally brighter printer-friendly version to be the final piece to be printed onto canvas.
I also made sure to save frequently and created a walk-through for this piece! My last walk-through gathered quite a bit of interest and ended up being my most favorited piece on DeviantArt, hoping this one also serves to help, or just interest, people!
[Click to full size]
The final piece hasn't turned out exactly as I hoped, and I've created 2 versions, a monitor-friendly version (the piece showed) which includes darker shadows and the like, and a higher contrast, generally brighter printer-friendly version to be the final piece to be printed onto canvas.
[Click to full size]
[Click to full size]
Labels:
Guides,
Picture Included
Sunday, 5 June 2011
Quldn't quait for quis quone!
[Click for full size: 1080p]
Sorry for the long wait between posts! Between exams and playing games because I've now finished my exams, I've not had as much time for art as I'd like, however I've been rectifying this!
As such, I present you with the female Qunari!
As you can probably tell, one of the games I've been glued to as of late has been Dragon Age 2. I've been putting off playing it as I knew I'd go full swing into it as soon as I started it up and, indeed that has been the case. However, after playing it for around 3 days straight (I'm not even sure any more) I've taken a break in order to get back to The Plan and produce this!
It took me two days, but I'm very happy with the result, and believe this to likely be my best piece yet. As such, and because it took so long to complete, I've included a guide to it's creation which you can view below, but before we get into that, a few things about this piece:
- It began as a 3cmx5cm sketch in my notebook as the bottom image (you'll see in the walkthrough)
- I cumulatively used more techniques on this piece then I've ever done before
- After I've finished typing up this blog post, I'm going to do a WoW raid then disappear back into DA2 for the rest of the night
Now, onto the walkthrough!
Labels:
Guides,
Picture Included
Monday, 16 May 2011
Now, for global domination...
First things first, it appears I now have readers from the UK, USA, Germany, France, China and Singapore! Thank you so much everyone for reading and I hope you continue enjoying this blog.
Now, onto business, as it were.
Yesterday, I mentioned the image used a compilation of the following things I've been working on recently:
Texturing
In the dragon scene, the texturing was incredibly easy. The main scale texture simply involved selecting the dragon, finding a suitable brush, increasing it's brush size (approx. 2000 pixels) and applying the texture to the dragon. Usually, you'd want to find a good, suitable texture (usually online, make sure you get permission if applicable) however in this case nothing more than a textured brush was needed.
Lighting/Shadows
Here, the main light source came from the green moon, however the red to purple horizon was also a light emitting source. The horizon implied being extended up into a purple sky, which was reflected into the fog below, whereas the stronger red and green sources were used as the main lighting points of the mountains, gryphons and dragon. Each retained a lot of their original colouring, though the edges closest to the light sources show the reflected colours. The clouds also show some colouring from the green moon, emphasizing the strength of the light source.
Contrast and Colour Theory
Colour theory dictates that colours on opposite ends of the spectrum compliment and contrast each other. Red is to Cyan//Green as Blue is to Orange. In fact, blue and orange is such a popular combination of complimentary colours it's set off a bit of a trend. A mini biology lesson: The human eye doesn't perceive all hues to be the same brightness, yellow seems naturally lighter than purple and so on. As such, orange and blue, as well as being of opposite hues, are also on opposite sides of our perceived view of brightness, making them a very dynamic contrast and possibly the strongest pair of complimentary colours available.
Within the dragon image, the green is used as a compliment to the red and purple hues, adding a point of interest in the sky. I also added the bright, contrasting moon to be a good light source to the gryphons, who would otherwise of been lost into the sky.
Image Composition
The rule of thirds comes heavily into play here. with the gryphons appearing on the upper-left cross section and the dragon taking up the lower right. There's also a very strong sense of purpose in the image (the dragon-predator and gryphon-prey) with the line-of-sight easily distinguishable between the two types of creature.
Backgrounds
Not much to say here, a background can introduce a strong sense of purpose to an image, through unless the scene contains feature points, try not to let them overshadow the main characters in the picture. Mergers are always a worry and should be avoided wherever possible.
That's all for today! Although: A small note I'd like to make is that there are many lifetimes worth of reading about good photo composition to be found online, though below I've included 2 particularly good websites with free, useful information about the subject. These lessons are invaluable both in photography and in digital artwork, and it's always worth keeping these ideas in mind when creating a piece.
Guidelines for Better Photographic Composition
How to Take a Good Photograph
Now, onto business, as it were.
Yesterday, I mentioned the image used a compilation of the following things I've been working on recently:
- Texturing
- Lighting
- Shadows
- Contrast
- Image Composition
- Colour Theory
- Backgrounds
Texturing
In the dragon scene, the texturing was incredibly easy. The main scale texture simply involved selecting the dragon, finding a suitable brush, increasing it's brush size (approx. 2000 pixels) and applying the texture to the dragon. Usually, you'd want to find a good, suitable texture (usually online, make sure you get permission if applicable) however in this case nothing more than a textured brush was needed.
Lighting/Shadows
Here, the main light source came from the green moon, however the red to purple horizon was also a light emitting source. The horizon implied being extended up into a purple sky, which was reflected into the fog below, whereas the stronger red and green sources were used as the main lighting points of the mountains, gryphons and dragon. Each retained a lot of their original colouring, though the edges closest to the light sources show the reflected colours. The clouds also show some colouring from the green moon, emphasizing the strength of the light source.
Contrast and Colour Theory
Colour theory dictates that colours on opposite ends of the spectrum compliment and contrast each other. Red is to Cyan//Green as Blue is to Orange. In fact, blue and orange is such a popular combination of complimentary colours it's set off a bit of a trend. A mini biology lesson: The human eye doesn't perceive all hues to be the same brightness, yellow seems naturally lighter than purple and so on. As such, orange and blue, as well as being of opposite hues, are also on opposite sides of our perceived view of brightness, making them a very dynamic contrast and possibly the strongest pair of complimentary colours available.
Within the dragon image, the green is used as a compliment to the red and purple hues, adding a point of interest in the sky. I also added the bright, contrasting moon to be a good light source to the gryphons, who would otherwise of been lost into the sky.
Image Composition
The rule of thirds comes heavily into play here. with the gryphons appearing on the upper-left cross section and the dragon taking up the lower right. There's also a very strong sense of purpose in the image (the dragon-predator and gryphon-prey) with the line-of-sight easily distinguishable between the two types of creature.
Backgrounds
Not much to say here, a background can introduce a strong sense of purpose to an image, through unless the scene contains feature points, try not to let them overshadow the main characters in the picture. Mergers are always a worry and should be avoided wherever possible.
That's all for today! Although: A small note I'd like to make is that there are many lifetimes worth of reading about good photo composition to be found online, though below I've included 2 particularly good websites with free, useful information about the subject. These lessons are invaluable both in photography and in digital artwork, and it's always worth keeping these ideas in mind when creating a piece.
Guidelines for Better Photographic Composition
How to Take a Good Photograph
Labels:
Guides
Subscribe to:
Posts (Atom)